Input/output of a task


|
Input/output of a task |
|
|
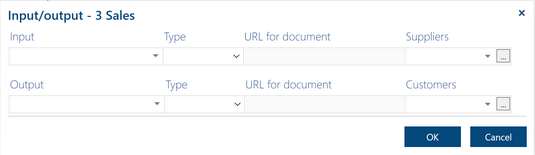
In order to define Input and Output properties for an activity or a subprocess select it and click on one of the small buttons behind Input or Output properties in the Property pane.
You can also click the Input/output link in the Mini property editor
In all cases the same Input/output dialog window will appear.
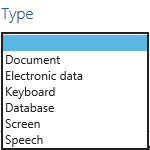
Enter a name of the input or output element and select its Type.
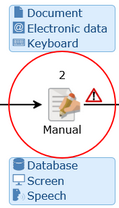
The type you select determines the icon that will be shown in front of the input/output item on the diagram. If an empty type is selected then no icon will be shown.
One of these types is always the Document. If you select it then you can also enter the URL for this document. If you type a name of the new item, select its type as Document, enter its URL and press OK then a new Document element will be automatically created in the Documents folder of the Tables folder of the project. If your project contains custom types with the Input/output scope then all these types will also be added to the Type list. If you select one of them, you can also type a name of a new item and it will be automatically created in the selected type folder after you press OK. Notice that URL field will only be enabled for the document-based type.
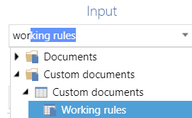
You can also select one of the existing documents or one of the items of the custom types with the Input/output scope. Just click a small triangle to unfold tree of all available documents and items.
Notice that if you start typing a name of an item that already exists then the tree will unfold automatically with the focus on the matching item.
If you select an existing item from this three its type will be set automatically in the Type field. If it is the Documents or a document-based type its URL will be shown in the third column.
Optionally, you can select Suppliers role(s) for an input element and/or Customers role(s) for an output element.
Use a button with the red cross to delete an element. Notice that a new empty line is added automatically to the list when you finish editing the previous line.
Press the Input/Output button in the Show/hide group of the Layout tab to see the input and output items on the diagram.
|